Return to The Objective Turntable Home Page
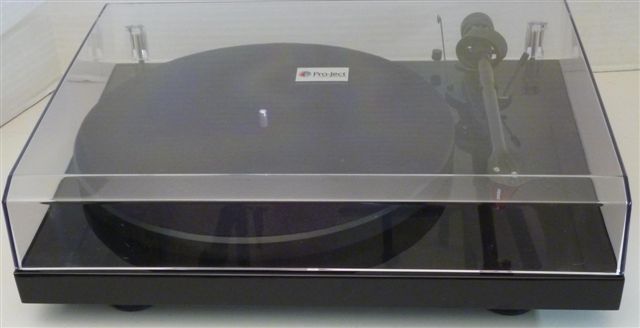
I needed a turntable. I have a couple, but the old Technics SL-1401 had some kind of intermittment in the arm wiring, and the inexpensive Dual CS-530 Belt-drive was mechanically kind of noisy. So, being the connoisseur of fine value that I am (ok, cheapskate), I googled the web looking for the consensus pick on a "High-end Starter" turntable. Talk about your oxymorons! Anyway, that's how I ended up with the Pro-ject Debut Carbon turntable you see in the picture above. It cost just $399 from Amazon and includes an Ortofon 2M Red cartridge.
OK, it was well-packed, felt solid, and looked slick. I had seen some complaints about the manual, but they must have cleaned up their act, because the manual I got was perfectly adequate. The anti-skating with the fishing-line and the weight seems a bit cheesy, but it all seemed to work ok. I guess it took about 15 minutes to put it together. I'm sure it would take much less time if you did it more than once. I hooked it up to my Akitika PR-101 preamp and Akitika GT-101 power amp, and gave it a listen.
Hey...this isn't bad, but what's all that mechanical noise? Sounds like a fish pump! Oh no, in the quiet grooves between the tracks it sounds like an airplane is coming in for a landing. Hmmm...maybe the grouchy guys making the nasty comments on Amazon actually weren't actually grouchy! Back to the web!
I went googling around to see...someone must have dealt with this problem. I found a really helpful set of posts on the subject here, in the AVS Forum. The thread was started by "gajCA", and has lots of helpful information. I'll make a long thread a bit shorter here. Briefly, there are two problems:
Since this web-site is "The Objective Turntable", I'll try to be a bit scientific as I describe the problems.
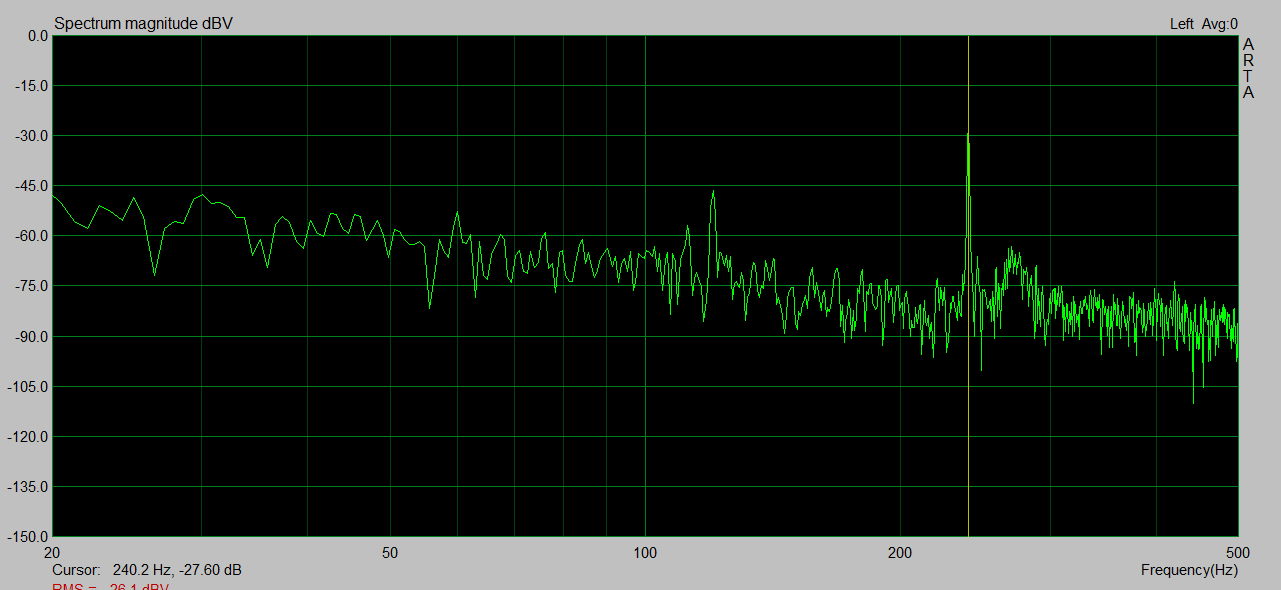
The standard motor mount arrangement, at least on my turntable, created a strong rumble component at 240 Hz. That's high enough in frequency to be obviously audible whenever the music on the record quiets down a bit. The potentially confusing thing is that the main mechanical noise sits at 240 Hz, a 60 Hz harmonic. Of course, the electrical hum noise is also at 60 Hz harmonics, thus it takes a little detective work, and a record with a long silent groove to tell the difference.
One other interesting thing to note...If you have a strong rumble component at 120 Hertz, it goes away when you close the dust cover!
I turned the motor turned off to eliminate the mechanical hum. That made it clear that there was more electrical hum than there should have been. I was able to drop it dramatically after playing around with the original RCA jacks. I tightened up the crowns of the male jack grounds at the turntable end. This brought the hum down significantly, but by now I was kind of hooked on cable improvements.
The next step, I grabbed a 3 RCA-to-3 RCA cable that came with an old VCR. It's RCA jack crowns were quite snug at both ends, and this dropped the hum even further! It brought to mind some experiments I had done recently with a PR-101 preamp. From the output side, if the amp-output is disabled, you'll see a 1000 Ohm 1% resistor from hot to gnd. I measured it with an old (not so nice) cable I had on hand, and got 1050 Ohms. I wiggled the cable, and poof...1001 Ohms. I wiggled the cable again, and got 1025 Ohms. Obviously the cable wasn't making a low resistance ground connection.
A low resistance ground connection on the phono input wires is a necessity! Imagine 10 Ohms in the ground connection, and 1 uA of hum current coupled into the cable. 1 uA times 10 Ohms give 10 micro-volts, but the gain at low-frequencies is at least ten times the gain at 1 kHz, so 10 micro-volts looks like 100 uV, and that compares to 3.16 mV from a fairly loud passage. That gives an SNR of just 30 dB with a loud passage, and much less than that with a soft passage.
At least when it comes to quiet cables, about the best you can do is use double shielded cable. Double shielded cable has both a wound braid and a conductive foil shield around the center conductor. This gives good shielding for both low frequencies (e.g. hum) and high frequencies (to avoid picking up FM and AM broadcast stations). I searched and read through Belden's web site, looking for their double shielded cables. Here's a summary of what I found in their document Recommendations for Home Theater and High-End Audio":
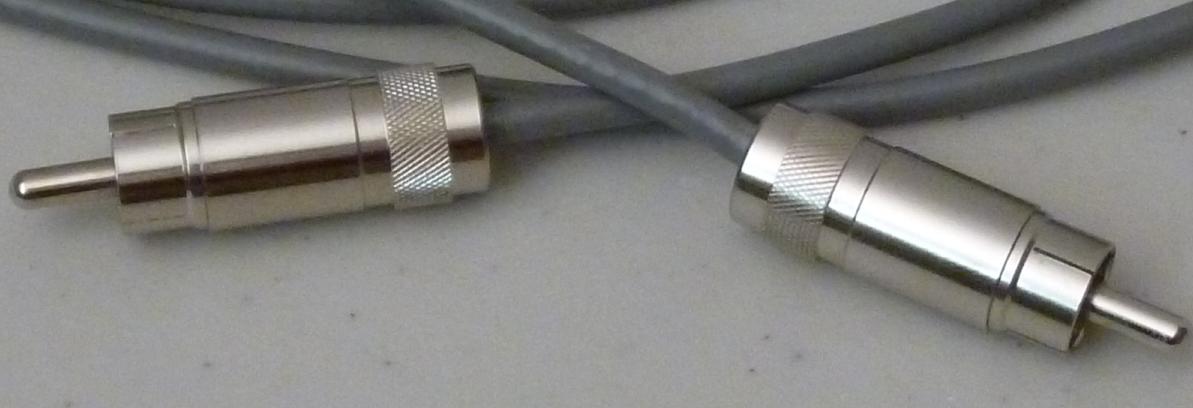
I used a 6 foot length of Belden 735A1 for each cable, and installed RCA plugs from Radio Shack. I had looked at a number of other more famous and expensive RCA plug-ends, but decided I'd start at the economy end of the spectrum. A nice and reasonable step up would be the Rean NYS352G. It has a nickel-plated shell with gold plated contacts. I've got some on order, and might write about them in the future.
Making the cables was a bit frustrating and painful (those connectors get hot when you solder them). Ultimately, it turned out quite well. Compared to the original cables that came with the Pro-Ject turntable:
Note that the Pro-Ject cables as originally received didn't fit the RCA jacks very well, and were originally quite a bit noisier than what I just reported above. A bit of plier work on the ground crown improved the Pro-Ject stock cables by making a better ground connection.
At least in my setup, there was very little 240 Hz hum. There was a lot of 240 Hz based motor noise or rumble, so it was quite easy to separate the two.
Let's start with a theory, that capacitively induced hum current to the cable shield is the dominant source of noise current. That noise current multiplied by the resistance of the ground connection appears in series with the cartridge output. For example, if we have just 1 uA of induced hum current on the ground wire, and 10 Ohms of ground resistance (owing to bad cable connections), then we'd have 10 micro-volts of hum at the input of the phono preamp. The gain of a phono preamp at 60 Hz is about 10X the gain at 1 kHz, so the 60 Hz looks like 100 micro-volts. We can compare this to the 3 mV that comes out of a typical cartridge at 1 kHz. The puts the 60 Hz just 3/0.1=300 times, or about 30 dB below the 1 kHz.
To test the theory, we started out with good cables and connectors, and added a gross amount of resistance in one ground leg...50 Ohms! The connections would have to be quite bad for this to be the case, but it's not unheard-of with older jacks and cables having years of oxidation, or even newer cables with bad contact for whatever reason. The 60 Hz harmonic increased from -51 to -35 dBv. A 7 cm/sec 1 kHz test tone produced -5 dBv. The Ortofon 2M red cartridge puts out 5.5 mV at 1 kHz at 5 cm/sec, so it will output 7/5*5.5=7.7 mV, or -42 dBv. That says that this arrangement had 37 dB of gain at 1 kHz, or 55 dB of gain at 60 Hz. The equivalent input noise at 60 Hz is then -35-55=-85 dBv, or 56 uV. Dividing this by 50 Ohms, we come to 56uV/50 Ohms=1.12 uA of 60 Hz noise current on the ground of the phono cable. It seems pretty plausible.
At 60 Hz, the wavelength is so long (5000 km) that this is not a radiation or antenna problem, but a capacitive coupling problem. If we pull out the classic first book on E & M fields for engineers, "Engineering Electromagnetics" by Hayt, 3rd edition, and look up the equation for a two-wire transmission line, we see that the capacitance between the wires (when the separation is much more than the diameter of the wires) is approximately
C=pi*epsilon*length/(ln(d/a)).
Let's take d as the distance between the phono wires and the power wires, as 0.5 meters. Let's take the conductor diameter a as 2 mm, or 0.002 meters. The capacitance between the shield of the cable and the power lines is then about 5 pF/meter of length of the phono cords. So, a 2 meter length of phono cords has 10 pF of capacitance to power wiring. Assuming 120 Volts and 60 Hz, the power wiring couples 120*2*pi*60*10e-12=0.45 uA of current. Although the result is nicely in the ballpark, I have to apologize in advance for the violence of the field theory approximations!
Simple summary...a low resistance shield connection is necessary for minimizing hum!
Stock turntable had large rumble component at 240 Hz
The information here is based upon the earlier mentioned thread started by gajCA in the AVS forum. We'll show the experiments and results from the motor mount changes that lead to dramatic reductions in the 240 Hz rumble.

I used a very good test record to make the rumble measurements. It's the Ultimate Analogue test LP, made by Analogue Productions. Amongst other very useful tracks, it has a lovely, long and quiet track. When you play that track, pretty much the only thing that remains is your baseline hum and turntable rumble. Having that track available made it relatively easy to measure the rumble before and after changing the mounting arrangement.
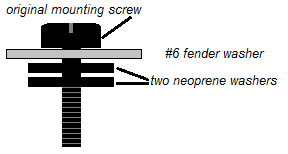
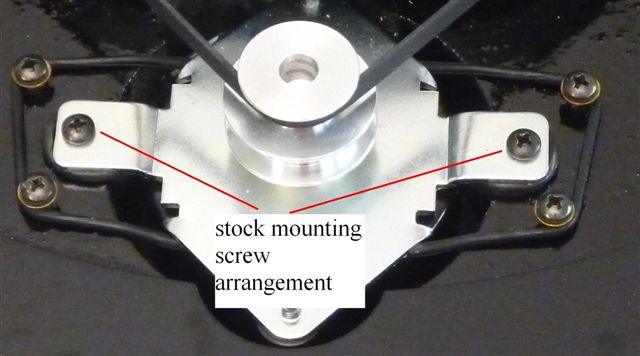
The picture below shows the platter removed, with the stock motor mount arrangement. gajCA's recommendation was to augment that arrangement with a pair of Neoprene washers (Crown Bolt Flat Washer, 6/32", Neoprene Rubber, comes 4 to a pack, available at Home Depot) and a fender washer under the stock mounting screws. That arrangement is shown in the following picture. Note that there's an element of art in the tweaking of the tension of the screws in the new arrangement. If you just tighten them down, it will be no better than the old arrangement.
The art comes in a tuning by ear process. Once you've installed the stock screws, fender washer, and 2 neoprene washers, you need to play with the tension while you listen carefully. Here's a quote from my posting on the AVS forum that details the process.
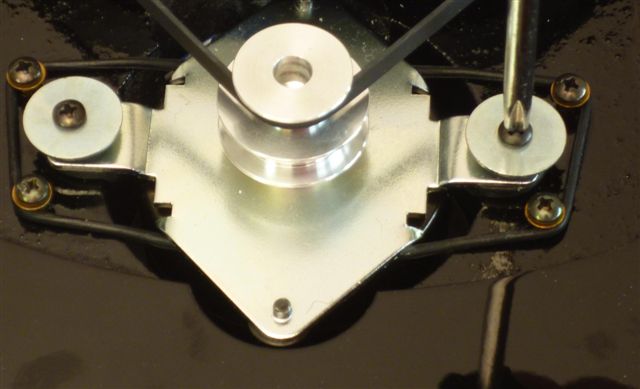
adjusting the tension of the new mounting arrangement, either by ear or with spectrum analyzer
"I tried the neoprene washers under a fender washer. It didn't seem to work. So I loosened it a bit...it seemed promising. It seemed like it would just be way too painful to tweak and pull the platter 47 times, so I played a bit, and I noticed that it seemed plausible to tune the system by ear with the platter off.
As I searched through a reasonable range of tightness in the screws/fender washer/neoprene washer, I could hear places where the motor sputtered and buzzed. Various sounds like soft trombones with various degrees and types of muting. As I searched, I found places that seemed very quiet compared to others, and some that were quite noisy. So, somewhere between loosey goosey and snug, I found a place where everything got quiet.
I popped the platter back on, and measured the noise spectrum on a quiet groove. The 240 Hz harmonic had almost totally vanished."
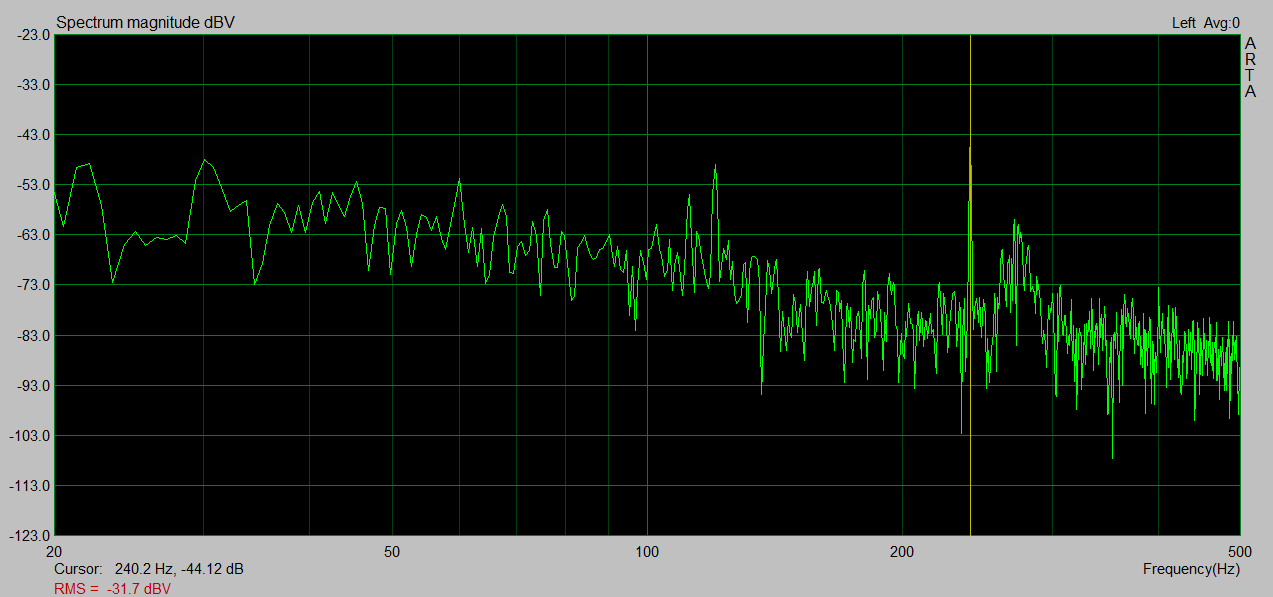
240 Hz rumble harmonic drops from -27 dBv to -44 dBv after tuning the new mounting arrangement tension
I repeated the experiment. I restored the system to its stock configuration. The 240 Hz rumble harmonic was -27 dBv. Tuning by ear, I was able to get to around -44 dBV, a 17 dB improvement (that's about what I got the first time I did the experiment). To try and make this a bit more repeatable, I set up the spectrum analyzer and used the top of an Amaretto de Saronno bottle to transfer vibration to the stylus. That let me see the noise while the platter was removed, and adjust the 240 Hz harmonic in real time for minimum level. Note: with the dust-cover in the up position, you'll also see a large 120 Hz rumble harmonic, but that diminishes greatly when I closed the dust-cover. The dust cover position didn't change the 240 Hz harmonic.
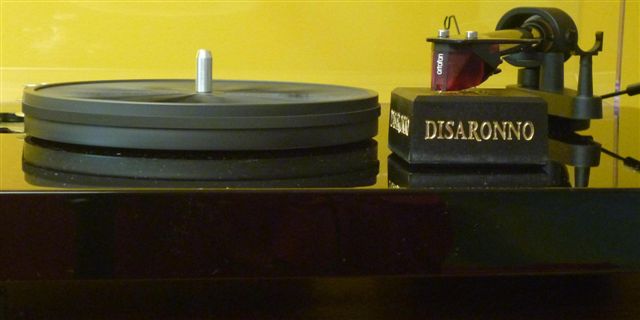
Using the top from a Disaronno bottle to transfer vibration to the stylus with the platter removed lets you adjust the tension of the mounting screws in real time while observing the spectrum analyzer
17 dB is a big deal...it's the difference in this case between something pretty disappointing, and something that's pretty nice! Should this amount of tweaking be necessary? Should my sample of the table actually have been considered defective?
No, not really. After the tweaks (better cables and adjusting the suspension) it sounds pretty good. However, if you read my review of the orbit turntable, you'll see that it performed better in important ways, and cost less. I sent my Pro-ject back after about 20 days.
BTW, if the Pro-ject guys are listening, there's one other thing that would be nice to improve. The arm sometimes descends so slowly after lowering the cueing lever that the needle skitters across the record a bit...particularly, but not limited to opening grooves. Yes, it's nice to have a nice, slow descent, but this is so slow that it often causes trouble.